Rather than move on to the next tutorial I decided to brush up on my photoshop skills, I decided to create an eye for my ‘bust’
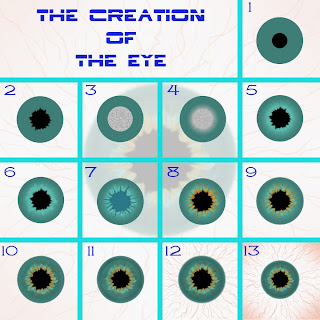
I began with the iris colour and the pupil (1) and used the liquify tool to smudge the edge of the pupil (2). Next I added another circle and added some noise to it (3) before using the zoom blur on it (4). I then, after changing the blend mode to make it look right (5) used the liquify tool again to mess up some of the straight lines created (6). Next I duplicated the iris and changed its colour and added some more detail to it (7) before placing it behind the iris and lowering the fill. The next steps (8)(9) involve duplicating the previous layer and changing them to 2 different shades of brown, rotating them and adjusting their size and fill level. To soften up the look of the eye I added a small amount of gausian blur to the iris (10) so it didn’t have such a harsh edge. Nearly there I added a black ring around the edge (11) to break up the eye a bit. Next, the veins (12) pretty self explanatory and finaly I added a light red circular haze around the eye to take the edge off the white (13).
In the last image you can see where I realised that I had not created enough white space around the eye for it to be used as a map. I figured rather than try, and ultimately fail, to extend all the veins out over more space the best option would be to reduce the size of the pupil and iris.

No comments:
Post a Comment